Sunday, April 21, 2013

Kitchen Makeover Reveal: Out with the Oak!


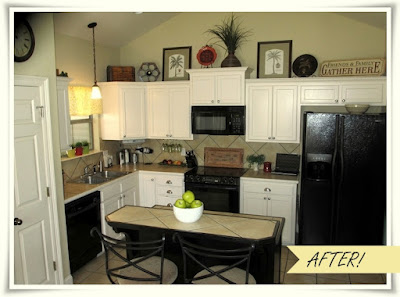
Well, what I thought would be a weekend project, took TWO ENTIRE MONTHS but hey, the kitchen is finally done!  I have always wanted a white kitchen and in January my brother, who is a professional painter on the side, decided to accept the challenge.  Now I knew it would take a while because he already has a full time job, so I had to brush up on my skills at being patient.  Whew.

Any-hoo, as much as I appreciate a pretty wood finish, I was just tired of the drab look of builder-grade oak.  Blah. So a makeover was definitely in order.

 
So, let the renovation begin!  Step one was to remove all the doors and then get a coat of primer applied.

No need for sanding since we used this handy-dandy primer, Bulls Eye 1-2-3 by Zinsser.  Who knew how easy this would be? (I am sure if my brother were reading this, he would growl at my use of the word "we". Ha.)


To create a stunning contrast, we decided to paint my island a glossy black!  Hard to envision it here, but just wait!  Yea!

Needless to say, I didn't get to park my car under the carport for two months.  But it was worth the wait!

Progress was slow, but eventually the drawers made their way back home, one by one.

Soon it was time for the first coat of black on my beautiful island. It was so awesome to see a vision come to fruition, however small.

FINALLY, after two months, my beautiful kitchen is complete!  I love the clean lines and brightness of the space.  Call me crazy, but I tell ya' the place looks bigger!

FYI, the color we chose was "Biscuit" from Sherwin Williams because it matched the current color of my interior doors and trim in my home so well.  Great job, Mikey!  :)


I chose brushed nickel half moon cup pulls for the cabinet hardware on the drawers because it gave the space that modern feel it needed; however, I kept the current brushed nickel knobs that were already on the cabinet doors and they matched beautifully.  If it aint broke, don't fix it, eh?
 

I'll admit I was nervous, but I can't tell you how happy I am with my new black island!  Perfecto!

I really like the dedicated space for my laptop.  I don't really need a desk; and the laptop is now in a very convenient spot for me to check email as I'm passing through.


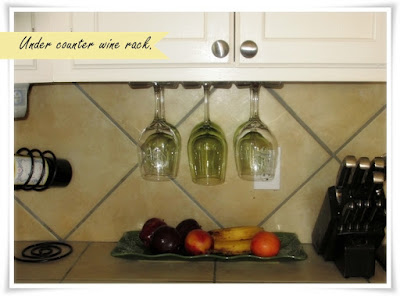
The rest of the pics are just fun shots of the nooks and crannies of my kitchen.  Enjoy!


And last, but not least, my funky chalkboard frame that I made from an old thrift store two-dollar frame!  Stay tuned for the DIY blog on that one.  


Well that's it for the kitchen makeover.  Don't miss out on the upcoming dining room makeover and craft nook makeover, plus lots more!  Cheers!


Monday, April 8, 2013

More White "Diamonds"! Thrift Store Treasures, Part Two

My obsession for white accessories continues and led me to yet another thrift store over the weekend.  (If you didn't catch the last post about my thrift store finds, check it out!)   I realize I will get to a point where I'll need to stop... but until then, I'm still amazed at how discovering these little treasures are like finding diamonds in the rough -- white diamonds, that is.

My first find was this absolutely precious basket weave porcelain bowl that I managed to snag for $4.  When I filled it will jelly beans leftover from Easter, I laughed out loud because it looked just like a bird's nest filled with sweet little eggs.  Perfectly delightful!


Next was this gorgeous footed white bowl. (I almost feel disrespectful calling it a "bowl".  What's another word for this beauty?  Help me out here, friends.)  So it wasn't as much of a steal at $10, but it was love at first sight so it couldn't be helped.  Again, I was compelled to fill it with remaining malted milk balls leftover from Easter.  (I have no doubt that I'll end up smearing one of the white ones across my lips for that classic frosty "lipstick". Come on'... you know you did that as a child!)


Just as I was getting giddy with my two previous finds, I came across this awesome set of three ceramic canisters with the lids for $7!!!  That made up for the $10 footed bowl.  I love using pretty unexpected containers for supplies, etc. so this was absolutely perfect, especially since I am in the process of making a tiny craft nook in my dining room.  (More on that in another post!)


Now just when I thought my mission was complete, I spotted this beautiful pure white porcelain bust of Jesus for only $4, that I knew I simply HAD to have.  I knew just where I wanted Him -- looking over my family from the mantle in my living room.  Perfect.


I so love thrift stores just because you NEVER know what you'll find next!  They are all diamonds in the rough, just waiting to be discovered and repurposed.  

What are some of your latest finds?  I'd love to hear your trash to treasure stories.


Saturday, March 23, 2013

How to Create a Fab Coffee Table Centerpiece for Less than $10

So I'm still in the process of redoing my kitchen and dining area (kitchen reveal to come soon), but due to the open floorplan I have, a living room redo is also in order.  You kinda' can't do one without the other.  The good news is that you don't need to take out a small loan just to obtain a new look.  With the right placement of odds and ends, a little paint and some colorful throw pillows, you can really give your home a facelift on a budget.

Today, I'm going to give you a couple of tips on how to create a cute coffee table centerpiece with little time and little money.  It just takes a good eye.

A little background -- I'm a thrift store junkie.  Love, love, love garage sales, thrift stores, etc. Trash to treasure is a real obsession with me.  So this morning as I'm sipping coffee and reading the paper, my mother calls to tell me she spotted a beautiful white apothecary jar at the local thrift store for four bucks.  Wha?  Seriously?  I nearly spilled the coffee I jumped out of bed so fast.  She knows my love for white accessories.

Thirty minutes later, I arrive at this little piece of heaven and in less than 10 minutes, I had three design must-haves in my arms.  So here are my finds of the day from the local thrift store in good ole' Plaquemine, Louisiana. 

1.  The initial mission: the white apothecary jar - $3.50.


I instantly fell in love with it because of its color and its height.  You always want to have one item on your table that has some height to visually keep it interesting.  Also if you stick with neutral colors it gives your centerpiece a calm uncluttered look, not to mention you can continue to use it even when you change your color scheme six months from now.

2.  My beautiful portugese bowl - $4.  Okay, so it was really $5 but I asked him to come down a bit.  I wouldn't have paid more than $2, but I flipped it over and noticed it was actually porcelain and made in Portugal, so for some reason I was intrigued and wanted it all the more (but not enough to pay the full $5. Ha.)


This bowl was perfect for my centerpiece because I needed something lower to complement the taller apothecary jar.  I also needed something to carry either fruit, greenery, flowers, etc. to break up all the white.

3.  Finally!  My favorite find of the day!  My hand painted ceramic horse straight from Brazil.  $2!!!  Always, always, always find just one piece that is either quirky, exceptionally pretty or some kind of conversation starter.  This was the perfect find and as always, the fact that it was made in Brazil was yet another reason to snag it.


So I get my goodies home and the first thing I do is find a touch of greenery to soften my centerpiece and I also found some fruit to place in my bowl.  I don't mind vases being empty but I've never been wild about leaving a bowl empty.  I dunno.  That's just me.  So after adding a couple of books to hold my quirky item, I had created a beautiful centerpiece in about an hour and for less than $10!  

 
So there you have it!  You can easily create a centerpiece with a few odds and ends and keeping a few handy rules in mind.

1.  Keep it inexpensive. Shop garage sales and thrift stores! You don't have to invest a lot and three months from now, you won't feel so bad when you want to change things around... again...

2.  Keep the majority of your items white or neutral.  This allows you to have that one "pop" of color or interest elsewhere.  Less is more when it comes to colors and patterns in a centerpiece.

3.  Vary your heights.  Choose a taller item, a shorter item and something in between if you must.  Prop things on books to get just the right size scape.

4.  Always add a quirky item.  And sometimes that one super cool find at the thrift store or yard sale will be just what you needed.  As they say, one man's trash is another man's treasure!

Hope you enjoyed this. Do you have any other suggestions for creating a special centerpiece?  Please share them here!


Thursday, March 21, 2013

9 Ways to Wring Your Own Neck!

This is a great "cheat sheet" provided by Charming Charlie regarding what type of necklace to wear with a specific neckline. A gal can never have too many tips when it comes to looking sassy!  I especially like it when a magazine will show several different ways to wear a great basic such as a white blouse or a simple sheath. Or maybe it's one of the articles showing the five "must haves" for Spring! Do you have any fashion tips you can share? Please do!

Thursday, March 7, 2013

Springtime Resolutions You'll Actually WANT to Keep!


So last year I made an attempt to offer you a list of resolutions that were fun and easier to keep than things like "lose 50 pounds" or "never get angry in traffic again."  But by resolution #3, I seemed to fall right off the map, didn't I?  Well I vote that we pick up right where we left off and apply these same resolutions to the remainder of 2013.  So let's revisit last year's list and make it happen THIS year!

Here we are, just a few weeks shy of springtime, and if any of you share my tendency to avoid anything remotely confrontational or uncomfortable, then I have a sneaky feeling that I’m not the only cowboy that’s fallen off the New Year’s Resolution wagon.  Am I right?  Or maybe you are one of those rebels that say, “You know what?  It stresses me out so much to try to accomplish something major or make any substantive changes in my life that I’m going to avoid the idea of making resolutions altogether!  What’s the point when I blow it by February???” 

My friend, I feel you.  And I’m here to tell you that it’s not too late to make some changes and a change doesn’t have to feel like a grave penance (which we, Catholics, strive so diligently to do during Lent – but that’s another blog).   It seems our resolutions always involve some sort of “corrective action” if you will, for something that is lacking in our life or to correct something society tells us we shouldn’t have been doing (i.e. overeating, swearing too much, drinking too much, watching too much television, drinking too much, not exercising enough, not volunteering enough, drinking too much).

Well, instead of making a list of things we feel OBLIGATED to do that feel like punishments, what about just setting some goals that will enrich your life, make you feel like you’re accomplishing something, and will be fairly easy to achieve?  Let’s face it – if it’s a miserable task, we’re not going to want to achieve it.  If it in involves fun and makes you feel good about yourself, then you want to tackle it!

With this concept in mind, I’ve established a list of 10 suggested goals that you can strive to achieve over the next year (or whenever – no rules here).  There’s no need to slit your wrists or put a bag over your head if you don’t achieve them.  And I’m not sure who came up with the rule that if you miss your goals by mid-February, then you’ve blown your opportunity to make it a great year.  That’s baloney!

Below is a list of 10 goals I will review over the next several weeks:

1. Read more.  Why not start with the Bible?  It’s a best-seller! How about organizing a book club?  It's on my top ten list.  (This was actually addressed in my August blog post! Check it out!)

2. Keep up with technology. Discover cool apps and websites that will make your life easier.  (Been there, done that... Check out the blog post here.)

 3. Make a wish board.  Grab a poster board, some magazines and some scissors, because this will be FUN!
  
4. Simplify Your Life.  Yeah, this may take more than one blog post. HA. 

5. Repurpose, Redefine, Redesign.
Great tips for cleaning out, reorganizing and recycling.  Disclaimer:  Sunny Belle will not be responsible for recycling of husbands, wives, significant others or in-laws.  The intended goal is to reduce clutter and use things more efficiently.  Intended goal is not applicable to anything with a pulse.
 

6. Pinch pennies. We’ll discuss the logistics of setting up a lemonade stand for supplemental income.  Just kidding. We will however, find reasonable ways to make it easier to keep some cash in our wallets!


7. Eat healthier and take care of yourself.  (Eww, sounds dangerously close to a real New Years’ Resolution, doesn’t it? Don’t worry.  We’ll make it fun.)

 8. Take more pictures.  We’ll learn photography tips, including how to store pictures and organize digital files and maybe even some scrapbooking tips!

 9. Document your thoughts.  There are so many cool ways to express yourself and record memories at the same time.  I’ll show you how.


10. Start and support small businesses. This is a trend that is growing by leaps and bounds!  We’ll check out the best resources for “keeping it local”.

Well, there you have it.  Over the next several weeks, I’ll cover one fun goal at a time and give you lots of useful information that just might make you look forward to making some simple changes in your life.

So get ready to climb aboard and enjoy the ride!  Cheers to 2013!


Related Posts Plugin for WordPress, Blogger...